Wednesday, December 30, 2009

My New Camera


I just purchased a new camera. It's not a very sophisticated camera but has a much better zoom feature than my last one. If I commit to posting photos to my blog, on a regular basis, I think I will follow through on really learning how to use this camera and hopefully to take better pictures. I have started with some of my favorite things that I have collected in the past. I have always loved blue and white china and these are some that are in my china cabinet along with some porcelain cows. I've always wanted a 'real' cow and, therefore, have received lots of 'cow gifts'----but never the real thing. I never really lived in a place where that was even a possibility. I always enjoy looking at other people's photos, so hope you will enjoy looking at mine.

Monday, December 28, 2009

More Tatting


Trying to get better at tatting. Made some butterflies, a mock ring heart, opera glasses and a
large rose colored heart. The large heart was made from some fine wool yarn my grandmother gave me so it's more than 60 years old. Found the pattern on a flyer at Hobby Lobby advertising thread sold by Handy Hands, Inc.
I'm experimenting with tatting along the edges of wide velvet rick-rack. Hope to post a picture soon. I'm feeling more comfortable with the tatting but still have so much to learn.

Friday, December 18, 2009

Tatting and Needlelace

Getting better with my tatting. Added a tatted border to a shirt. Have also been playing with needlelace and did 2 small pieces inside a silver hoop. I'm collecting all my little samples to put into a collage.

Thursday, November 26, 2009

New Initial Pincushion


Used the leftover threads from my bobbin egg for my inital 'D' and put it on a new pincushion. I've been wanting to learn how to add a thread to the middle of a bobbin lace piece when one runs out so just did a little easy sample piece to learn that technique. I'll wind up using it in a quilt collage. That was easier than I thought it would be.

Thursday, November 12, 2009

My New Hedgehog


I recently found out that the hedgehog is kind of a mascot for bobbin lacers, what with all the pins we use in lace making. A friend of mine gave me a cute little hedgehog today and I named him Bobbi (for bobbin lace). Bobbi is in the picture with all my bobbin lace samples that I made to learn the different stitches. He's kind of cute, I think....

Monday, November 9, 2009

First Bobbin Lace Piece


I finally finished my first 'real' bobbin lace piece. All the previous ones were just learning samples. This egg was made with a linen 80 weight thread. I did make some mistakes but it was a good learning experience and I'm pleased with the way it came out. This pattern came from the book 'Neue Klöppel-Ostereier' by Annelies Kirst. I believe the book is in German. I have some leftover threads on my bobbins so I prepared a pattern to do my initial 'D'. That should use up all the thread that remains. Once that's done, I expect to use the same pattern with different colors and an 18 weight thread which should give it a very different look.

Sunday, October 25, 2009

Simple Green

Just a short FYI post about a product that I've used for the first time and it is wonderful. Simple Green is a cleaning product that is non-toxic and biodegradeable. I was at the Houston show last week and saw a demonstration on Shiva Paintstiks given by Iris Jarvis. When it was time to clean up, she used this product, SIMPLE GREEN, and the clean up was so easy. Shiva Painstiks are oil based so cannot be cleaned up with just soap and water. I bought this product in the cleaning section of the supermarket. I think I'll be using my Shiva Paintstiks much more frequently now.

Wednesday, October 21, 2009

Pillow for Teneriffe Lace

FRONT OF PILLOW

BACK OF PILLOW

Found this little pillow at the thriftstore for 99¢ and thought it was a pincushion. It is 4" in diameter. I have since been told that it is a pillow used to make Teneriffe Lace and there is a partially finished piece of lace on the pillow. Wish I knew how this pillow originated and who owned it. I have looked through some lace books but do not find this type of pillow. I do hope to use it to make some Teneriffe Lace. If anyone knows anything about this pillow, please leave a comment or e-mail me.

Thursday, October 15, 2009

Sheer Fabric Experiment -- 2nd layer

My first layer was very chaotic. This one is very orderly, done in solid black and polka dot black organza. All hand stitched. Now to get the 2 layers to work well together. Onto more experimenting.

Wednesday, October 7, 2009

Experimenting With Sheer Fabric

Hand stitched sheer fabric / single and double layered sections
Step 1: overlay fabrics

Step 2: baste down with invisifil thread


Step 3: fold over to cover raw edges and do a running stitch with 2 strands embroidery floss

This is the top layer of an experiment with sheer fabrics. Have some ideas about how I will finish it but need to do some more experimenting. The piece is approximately 18" x 20". I have included the steps showing how the seams were stitched. It looks exactly the same on the front and the back.
If you are interested in experimenting with sheers or Korean Patchwork, known as pojagi, Lily Kerns has set up a yahoo group so all interested can share ideas. If you would like to join, just click on this link: http://groups.yahoo.com/group/pojagi-arts .

Sunday, September 20, 2009

Update on Korean Patchwork


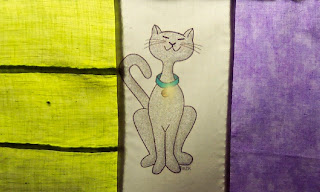
Here is my first sample piece of pojagi. I'm sure I didn't follow all the rules. I probably should have starched the fabric so it would hold it's shape. I used sheer hankies, old linens, some clip art and cat photos printed on fabric and the border is just plain cotton. I loved doing the handwork but it does take quite a bit of time. This piece wasn't planned ahead of time but I think I will plan my next piece using only sheer fabrics, so that there will be no front and back. Hope I've inspired some of you out there to try it.

Saturday, September 12, 2009

KOREAN PATCHWORK (Pojagi)

Front of patchwork held up to the light.

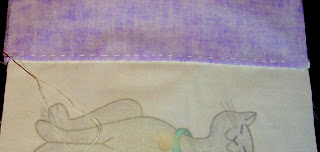
Place 2 pieces of fabric together with wrong sides facing each other. Sew an overhand stitch just under 1/4".
When overhand stitch is completed, turn the fabric so that the 2 pieces are now facing with right sides together. You then do a running stitch so that your overhand stitch is encased between the right sides of the fabric.

The final step is to open up the fabric with the back side facing you and hem stitch that 1/4" encased seam down. The right side of the fabric will just show the tiny hem stitches. The back side of the fabric will show the running stitches.

Ever since 2007, I have become fascinated with this ancient type of Korean patchwork and have done lots of research to try and learn how it is done. There aren't any books in the USA (that I could find) that actually describe the procedure. I have gotten hints from many different sources and have done lots of experimenting. I think I finally have gotten it right.
The word pojagi refers to square hemmed cloth of various sizes, colors, and designs, which Koreans used to wrap, store, or carry things. Pojagi was not only for practical and versatile items in the daily lives of Koreans, but was also very artistic. Most of the pieces are done with sheer silks, linens, and cottons that are transparent and, therefore, the seams becme part of the design when held up to the light. If you are interested in reading more about this, research the words pojagi, bojagi, chokakpo and gekki stitching.
I am posting some pictures with explanations of how this is done. Feel free to e-mail me if you want to try this and my explanation is not clear.

Thursday, August 27, 2009

Bag made using Reversible Quilt technique.


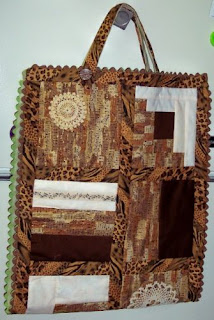
Made a bag (10"x10") using the reversible quilt technique. Nice not to have to add a lining, but sewing bottom of bag closed was much too difficult for me to do this again. Another good 'craft on the go' bag.

Sunday, August 16, 2009

Class in Reversible Quilts


I'm just finishing up a class on making 'Reversible Quilts' through Quilt University. Lots of inspiration there for future projects. Each block is pieced with batting and quilted and then the blocks are put together with sashing and finally bound around the edge. I did my edge a little differently because I wanted the binding to match the sashing on each side, and I added some rickrack for fun. Once the blocks are put together, your quilt is complete. It measures about 14" x 35" and will probably be used as a holder for rolled up patterns and stabilizers. For more information about this class, check out http://www.quiltuniversity.com/.

Thursday, August 6, 2009

A New Bag for my Tatting Supplies


I belong to a quilt bee that meets every Thursday at the local library. When any of us decide to get rid of some fabric we know we'll never use or unfinished projects we will never get to, we bring it to bee and offer it up to anyone interested. Barb brought an unfinished project that caught my eye and I came home and made a new drawstring bag for my tatting supplies. I lined the bag with some cotton batting and a bright red print fabric. Can't wait to fill it up. Thanks, Barb.

Tuesday, August 4, 2009

Calligraphy Brushes from Asia


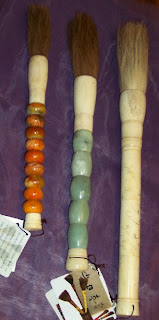
I had the opportunity to purchase some beautiful calligraphy brushes today from Tuesday Morning, Inc. I have done lots of calligraphy using pen and ink but never with a brush. Anxious to start experimenting. Thought you might be interested to read the information on the attached card: "The history of Chinese calligraphy "Shu Fa" is as long as that of China itself. It is often thought to be most revealing of one's personality and one of the highest forms of Chinese art. Hand made in Asia in the age old process of the antique brushes, each is unique. Handles are crafted from natural products including: jade, bamboo, cow bone, ceramic and coral. The bristles are also natural including sheep or goat hair. They are very absorbent and supple, and produce rounded forms and saturated fleshy brushstrokes. A beautiful collectable."

Sunday, July 19, 2009

PLANTS ON A TREE STUMP


I had to have 2 of my Redbud trees chopped down a few weeks ago due to weak, falling limbs. I had the treemen leave the stumps of the trees so that I could use them as plant holders. I had 2 of those lined plant baskets that fit perfectly on the 2 large stumps and purchased a small one for the smaller stump. I attached them with those strong heavy duty staples and put in some purslane. I had to select a plant that would withstand the over 100 degree days we have had for over a month, with little or no rain. After just a few weeks of watering daily, they have filled out the baskets and look great. The second Redbud stump has a basket ready for planting green peas, however, I'll have to wait until September to do that when the weather is a bit cooler.

Friday, July 17, 2009

LITTLE BAGS AND COVERED BUTTONS


I worked on little things last week. I have lots of fabric scraps and decided to make some little bags to hold lace tools, crochet hooks, etc. I also covered some buttons with fabric and did some embroidery, beading and crochet to embellish. Had fun doing the buttons and am planning to do some more real soon. Still don't know how I'll use them but I know eventually something will come to me.

Friday, July 3, 2009

BEAUTIFUL NEW BOBBINS


Some beautiful new bobbins purchased from a bobbin maker in New Zealand. Check out his website: www.mairestudio.co.nz .

Friday, June 26, 2009

NEEDLE FELTED TAGS


Finally brought out my embellishing machine to make some needle felted tags. The base was wet felted and then, with the embellisher, I added threads, sliver of roving, lace, yarn, etc. I hand stitched some beads on the 1.5"x3.5" pieces. I fused some stiffener between the felted piece and piece of ribbon and then did a blanket stitch around the edge. Gave several as gifts and I hung one on my camera with a name & address label on the ribbon side. All just for fun.

Wednesday, June 17, 2009

LEAF PURSE


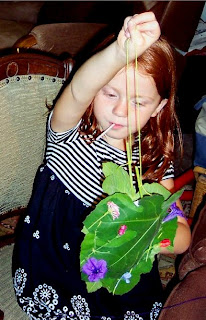
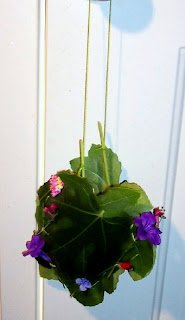
While walking through Morningside Park in NYC, there was a mom and daughter making leaf purses. She stitched 2 leaves together with a green vine and interlaced flowers in the stitching. I thought it was such a great idea that I tried it with Skye. We used fig leaves and Skye picked flowers from the garden. It turned out beautiful.

NEW YORK CITY TRIP 2009

Just got back from a one week visit to NYC. Spent a day in the garment district shopping, went to MOMA, Guggenheim, Cooper-Hewitt Museum (great felting exhibit), American Folk Art Museum (Paula Nadelstern exhibit), Roosevelt Tram, 42nd St. Library, Soho, Washington Square Park, Morningside Park, Top of Rockefeller Center, Conservatory Gardens in Central Park, Hell's Kitchen Flea Market, and the Empire Quilt Guild Meeting. Sooooo tired, but had a great time. If you'd like to see some NYC pictures, click on the slideshow.


Overview of NYC trip June 2009

Tuesday, May 5, 2009

Decorated Backpack


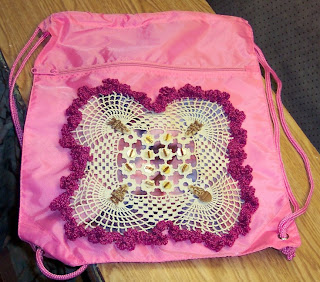
I had a backpack with a logo on it that I wanted to cover. I used an old doily that my
grandmother had made in the 1940s. I backed the doily with fabric, crocheted an edge on it (used thread from my grandmother's stash), added beads and attached it to the backpack.
Plan on using it on my next trip.

Monday, May 4, 2009

New Bobbin Lace Pillow and Bag

Inside of Bobbin Case
Bobbin case

New Bobbin Lace Pillow with some samples made.
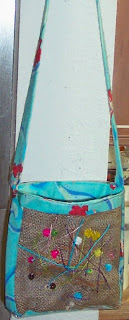
I made another Bobbin Lace pillow so that I could work on more than one project at a time. Also made a bag to hold all of my bobbins out of a piece of seminole patchwork done quite a long time ago.


Wednesday, March 11, 2009

Skye Learns to Sew


I've been teaching 4 year old Skye, my next door neighbor, how to sew. We started with burlap, pearl cotton, and a plastic needle. Skye chose the colors and also added some beads. She said she wanted a purse so I added some strips of fabric and covered it with vinyl to protect the stitching. I know she will love it.


Wednesday, March 4, 2009

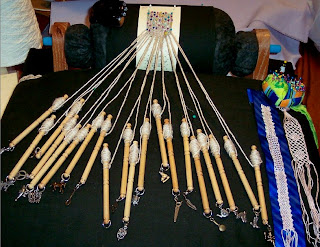
Learning Bobbin Lace


My latest interest is bobbin lace. Karen Hickman is a wonderfully patient teacher. It's taking me a while to learn this craft. I made my own pillow and added charms to the bobbins which are said to give weight to the bobbins so they hang properly. My goal is to be able to work with the new, thicker, yarns that are popular now and to design my own patterns so that I can incorporate the lace in my quilts.
Saturday, February 21, 2009

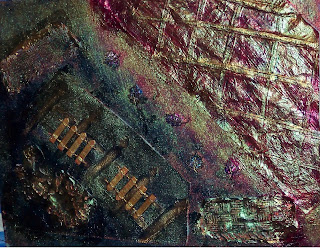
TEXTURED SURFACES


I took a class awhile ago to learn how to produce textured surfaces using paint, fabric, canvas, tyvek, etc.
Here are just 2 of the many pieces I did. The class was given by Linda Monk and Carol McFee at www.fibreinform.com. A great learning experience.

Saturday, January 24, 2009

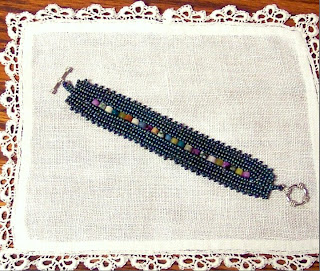
NDEBELE BRACELET

I took a class at 'Sea of Beads' in Austin, TX to learn how to create this Ndebele bracelet. I just completed it last night and this one goes to my friend Judi in NYC. I will now make one for myself and maybe a couple more for gifts. It's very relaxing doing the beading at night while watching TV.

Tuesday, January 20, 2009

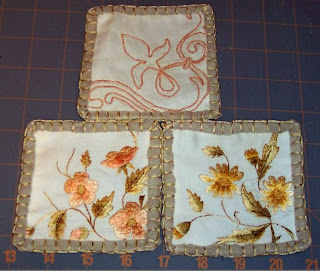
EMBROIDERY FROM THE 1930's


There was a question on the quiltart list about embroidery with a very old sewing machine. These pieces (borders are my addition) were embroidered in the 1930's by my grandmother (my dad's mom) on her sewing machine. I have had them for years and haven't yet decided how to preserve them. Any ideas are welcome. I thought about a needle book but I would rather use them in a display. I have one more piece (someplace) that I haven't yet worked with. I wasn't going to post these until completion but since the question came up I thought maybe someone would offer some suggestions.

Tuesday, January 13, 2009

FLEECE REMNANTS

While making a fleece baby blanket, I had lots of remnant strips and hated to just throw them away. I joined the strips together and used size 17
knitting needles to knit a background piece. I cut out a cow remnant and some purple circles and hand embellished them to the background. I think it makes a cute little wall hanging for a babies room.


knitted background


joining strips
Related Posts Plugin for WordPress, Blogger...